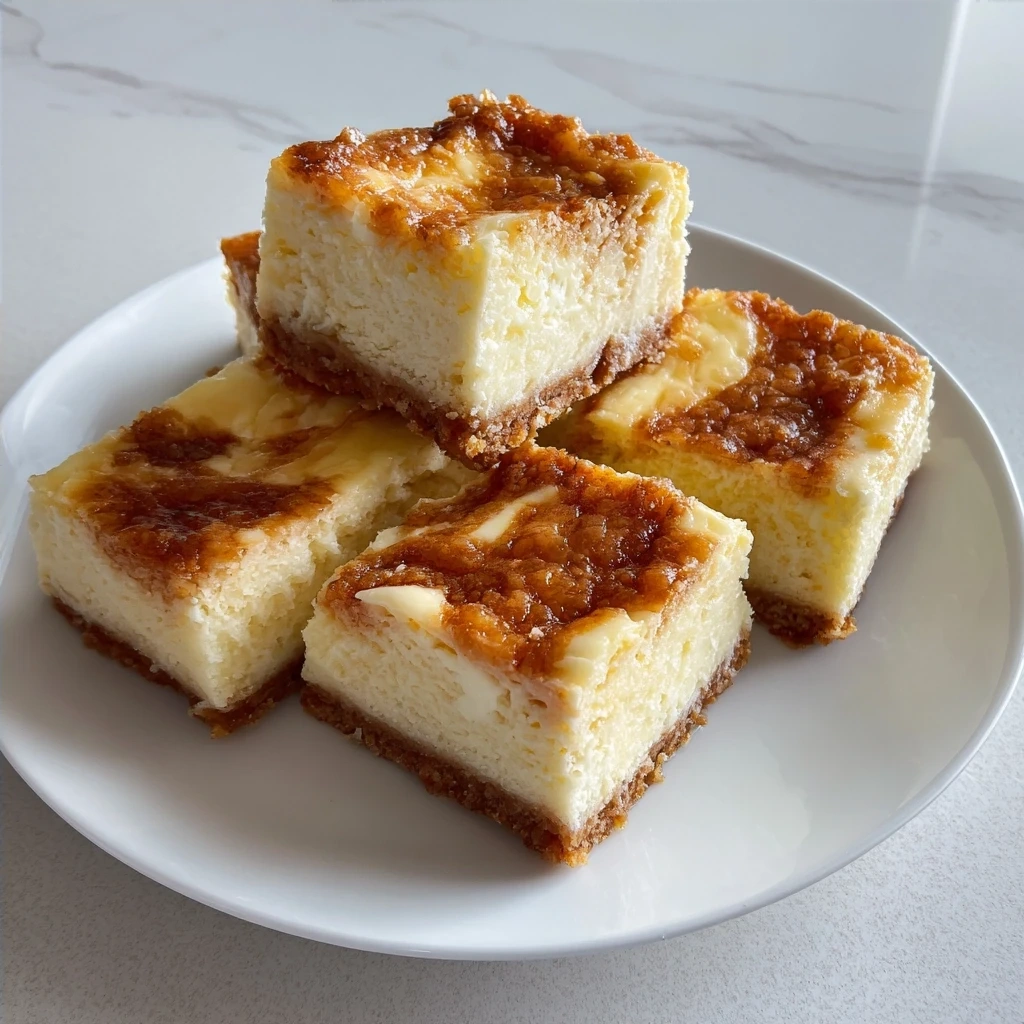
One of my favorite things about cooking is how a single dish can transform an ordinary day into a special memory. For my family, these Lemon Marbled Cheesecake Bars have done just that. The bright citrus notes mixed with creamy cheesecake create a symphony of flavors that everyone loves.
What started as a simple baking experiment soon became a cherished tradition. Now, I’m thrilled to share my kitchen adventure with you, fellow flavor seekers, hoping you’ll find as much joy in making these Lemon Marbled Cheesecake Bars as my family does. This recipe is perfect for anyone looking to add a touch of sunshine to their table with a dessert that’s both easy and impressive.
The beauty of these Lemon Marbled Cheesecake Bars lies in their simplicity. With a few quality ingredients and straightforward steps, you can create a treat that will impress your loved ones. The combination of tangy lemon and rich cheesecake is a surefire way to bring smiles and create lasting memories around the dinner table.
Join me on this delightful baking journey, and let’s create some unforgettable moments together! I am excited to share my recipe for these amazing Lemon Marbled Cheesecake Bars!
INGREDIENTS You’ll Need:
Here’s what you’ll need to create these delightful bars. Trust me, this ingredient list focuses on quality over quantity for authentic flavors!
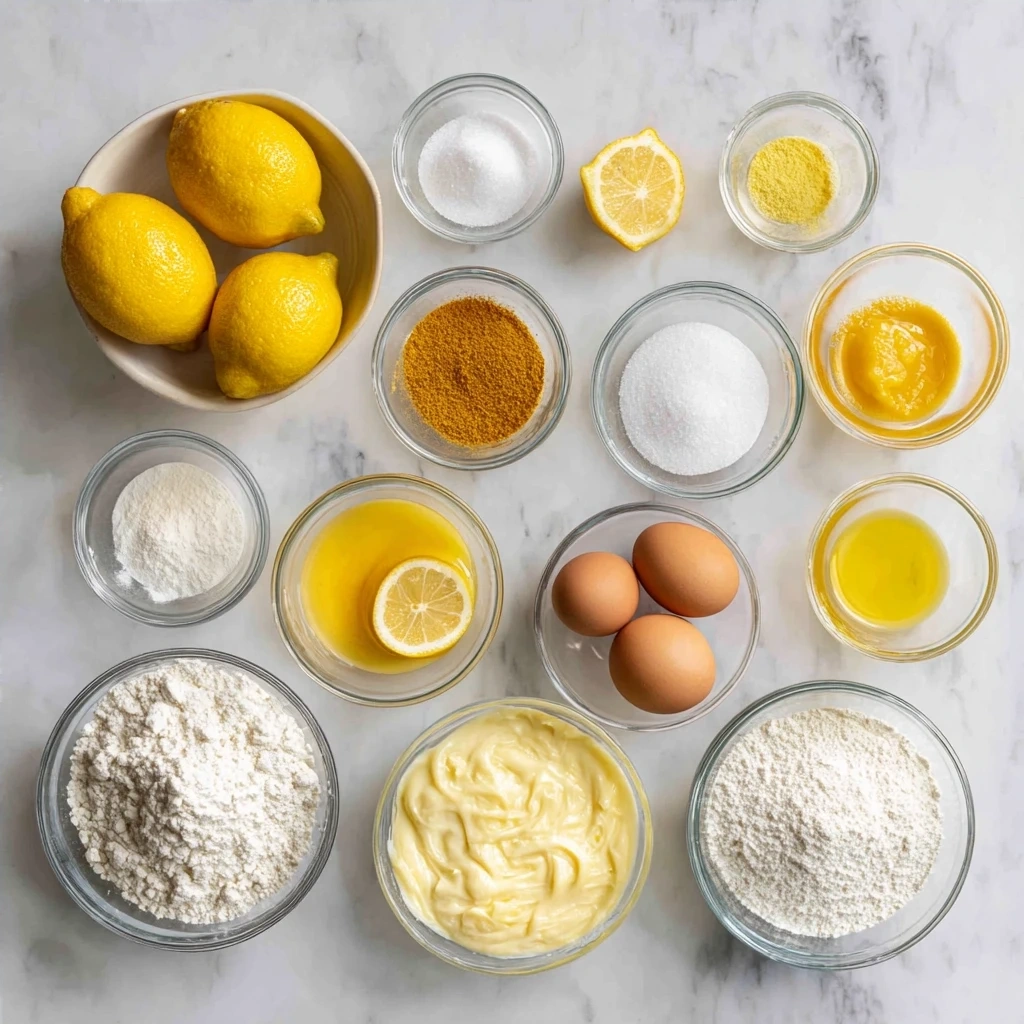
- For the Crust:
- 1 ½ cups graham cracker crumbs: I prefer using a food processor for even crumbs.
- 5 tablespoons unsalted butter, melted: Adds richness and binds the crust.
- ¼ cup granulated sugar: For a touch of sweetness in the crust.
- For the Cheesecake Filling:
- 24 ounces cream cheese, softened: Ensure it’s fully softened for a smooth filling for these Lemon Marbled Cheesecake Bars.
- 1 ⅓ cups granulated sugar: Provides the perfect sweetness balance.
- 2 large eggs: Binds the filling and adds richness.
- ½ cup sour cream: Adds moisture and a slight tang to complement the lemon.
- 2 tablespoons all-purpose flour: Helps to stabilize the cheesecake.
- 1 teaspoon vanilla extract: Enhances the overall flavor profile.
- For the Lemon Swirl:
- ⅓ cup lemon juice, fresh: Freshly squeezed is a must for the best citrusy flavor in these Lemon Marbled Cheesecake Bars.
- ¼ cup granulated sugar: Balances the tartness of the lemon juice.
- 1 tablespoon lemon zest: Adds a concentrated lemon flavor.
For the best flavor in your Lemon Marbled Cheesecake Bars, I recommend using high-quality cream cheese and fresh lemons. You’ll find the freshest ingredients for this Lemon Marbled Cheesecake Bars at your local farmer’s market or specialty grocery store. My family loves when I add a bit of extra lemon zest to the filling for an extra burst of citrus flavor!
This Lemon Marbled Cheesecake Bars proves that authentic flavor comes from thoughtful ingredient choices. Here’s an Lemon Marbled Cheesecake Bars flavor secret that transformed our family dinners: always use fresh lemon juice, it makes a noticeable difference!
Let’s Create This Together!
Follow these easy steps to create your own Lemon Marbled Cheesecake Bars. Here’s where I used to miss a key step with my Lemon Marbled Cheesecake Bars – learn from my experience!
- Prepare the Crust:
- Preheat your oven to 350°F (175°C).
- In a medium bowl, combine the graham cracker crumbs, melted butter, and sugar. Mix well until the crumbs are evenly moistened.
- Press the mixture firmly into the bottom of a 9×13 inch baking pan.
- Bake for 8-10 minutes, or until lightly golden. Let it cool slightly.
- Make the Cheesecake Filling:
- In a large bowl, beat the softened cream cheese and sugar until smooth and creamy.
- Add the eggs one at a time, mixing well after each addition.
- Stir in the sour cream, flour, and vanilla extract until just combined. Be careful not to overmix.
- Create the Lemon Swirl:
- In a small bowl, whisk together the lemon juice, sugar, and lemon zest until the sugar is dissolved.
- Assemble the Bars:
- Pour the cheesecake filling over the prepared crust.
- Drizzle the lemon mixture evenly over the cheesecake filling.
- Use a knife or skewer to swirl the lemon mixture into the cheesecake, creating a marbled effect.
- Bake the Cheesecake:
- Bake in the preheated oven for 25-30 minutes, or until the cheesecake is set around the edges but still slightly jiggly in the center.
- Turn off the oven and let the cheesecake sit in the oven with the door slightly ajar for an hour. This helps prevent cracking.
- Remove the cheesecake from the oven and let it cool completely at room temperature.
- Chill and Serve:
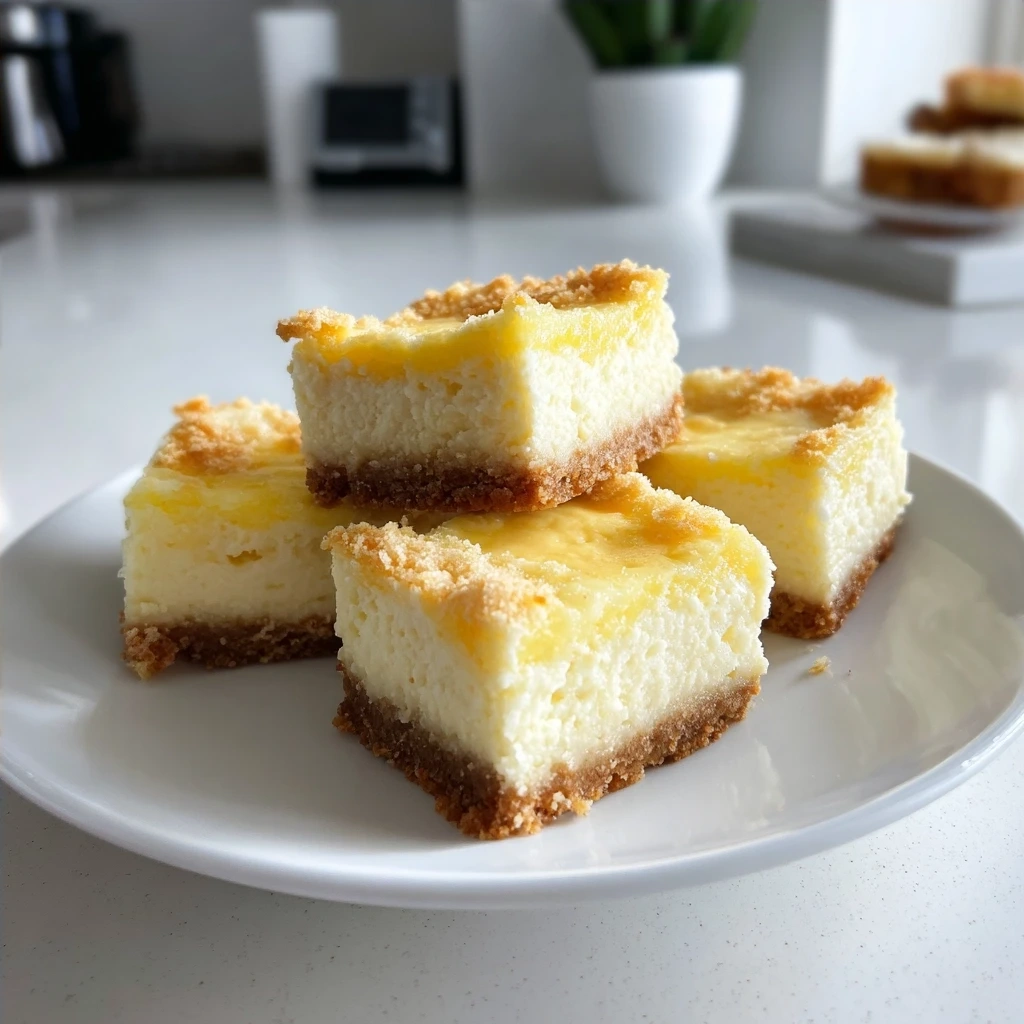
- Cover the cheesecake and refrigerate for at least 4 hours, or preferably overnight, to allow it to fully set.
- Cut into bars and serve chilled.
In my kitchen, this flavorful Lemon Marbled Cheesecake Bars typically takes about an hour of prep time and about 3 hours to bake and cool. Perfect time to appreciate the aromatic transformation! Your Lemon Marbled Cheesecake Bars should fill the kitchen with amazing aromas by now.
Don’t be surprised if your Lemon Marbled Cheesecake Bars develops a slight golden crust on top. This adds to the rustic charm! Here’s where I used to miss a key step with my Lemon Marbled Cheesecake Bars – learn from my experience! Allowing the cheesecake to cool gradually in the oven prevents cracking.
While your Lemon Marbled Cheesecake Bars is developing these flavors, take a moment to appreciate creating something special for your family! For more genuine cooking ideas for family meals, explore these Pecan Pie Cheesecake Bars!
How We Love to Enjoy This!
These Lemon Marbled Cheesecake Bars are incredibly versatile and can be enjoyed in many ways. The family gathers quickly when this aromatic Lemon Marbled Cheesecake Bars appears with a dollop of whipped cream and fresh berries. Here are some of our favorite ways to serve them:
- Classic Presentation: Simply cut the chilled cheesecake into bars and serve. The marbled effect is beautiful on its own.
- With Fresh Berries: A handful of fresh raspberries, blueberries, or strawberries adds a burst of color and complements the lemon flavor perfectly.
- Whipped Cream: A light and airy whipped cream topping enhances the creamy texture of the cheesecake.
- Lemon Zest Garnish: Sprinkle a bit of extra lemon zest on top for an added pop of flavor and visual appeal.
These Lemon Marbled Cheesecake Bars are perfect for those evenings when we want something truly satisfying! They are also a hit at gatherings and potlucks. I often make a double batch because they disappear so quickly! For more information on lemon cheesecake bars, check out this recipe for Meyer Lemon Cheesecake Bars with Lemon Curd Swirl | Love and Olive Oil.
For a seasonal twist, try adding different citrus fruits like orange or grapefruit to the swirl. You can also get creative with the crust by using different types of cookies or adding chopped nuts. This flavorful Lemon Marbled Cheesecake Bars reminds me of another family favorite, Caramel Apple Cheesecake Bars!
Leftovers (if there are any!) can be stored in an airtight container in the refrigerator for up to 3 days. They are just as delicious the next day! My kids love taking them to school for a special treat.
FAQs: Your Questions Answered
Here are some common questions I get about making Lemon Marbled Cheesecake Bars.
- Does this Lemon Marbled Cheesecake Bars really satisfy hearty appetites? Absolutely! The rich cheesecake filling combined with the tangy lemon swirl is both satisfying and refreshing. It’s a crowd-pleaser every time.
- What if someone in my family prefers milder flavors in their Lemon Marbled Cheesecake Bars? You can reduce the amount of lemon juice in the swirl or add a layer of plain cheesecake filling on top to balance the flavors.
- How can I prepare this Lemon Marbled Cheesecake Bars ahead for busy weeks? This is a great make-ahead dessert! Prepare the cheesecake bars as directed, then cover and refrigerate for up to 2 days before serving.
- Can I use a different type of crust? Yes! A shortbread or gingersnap crust would also be delicious. Feel free to experiment with your favorite cookie crumbs.
- What’s the best way to prevent the cheesecake from cracking? The key is to cool the cheesecake slowly. Turn off the oven and let it sit inside with the door ajar for an hour before removing it to cool completely.
- Can I freeze these Lemon Marbled Cheesecake Bars? Yes, you can freeze them for up to 2 months. Wrap them tightly in plastic wrap and then in foil to prevent freezer burn. Thaw in the refrigerator overnight before serving.
- What if my cream cheese is not softened enough? You can microwave it in 30-second intervals, stirring in between, until it is soft but not melted. Softened cream cheese is crucial for a smooth and creamy filling for these lemon cheesecake squares.
If you love these authentic flavors, you’ll appreciate these Halloween Oreo Brownie Bars! For more tips, see this article about Lemon Cheesecake Bars Recipe. For additional ideas, you can see some suggestions on Can I swirl lemon curd into cheesecake batter?
Final Kitchen Wisdom:
These Lemon Marbled Cheesecake Bars are more than just a dessert; they are a symbol of the joy and connection that comes from sharing delicious food with loved ones. They perfectly support my family’s authentic meal goals by providing a homemade treat that everyone enjoys.
My Lemon Marbled Cheesecake Bars Flavor Secrets:
- Fresh Lemon is Key: Always use freshly squeezed lemon juice and zest for the brightest, most vibrant flavor.
- Don’t Overmix: Overmixing the cheesecake filling can incorporate too much air, leading to cracks. Mix until just combined.
- Patience is a Virtue: Allowing the cheesecake to cool slowly in the oven is essential for preventing cracks and ensuring a creamy texture.
Family-Tested Lemon Marbled Cheesecake Bars Variations:
- Orange Swirl: Substitute orange juice and zest for the lemon for a sweeter, milder flavor.
- Berry Swirl: Add a swirl of raspberry or blueberry jam to the cheesecake filling for a fruity twist.
- Chocolate Chip: Fold in mini chocolate chips to the cheesecake filling for a decadent treat.
My kids love the classic lemon version, while my husband enjoys the orange swirl variation. I encourage you to make this recipe your own by experimenting with different flavors and ingredients.
I hope this recipe brings as much joy to your family as it has to mine. Embrace the process, enjoy the aromas, and savor the delicious results. Happy baking, fellow flavor seekers! Now you have the power to create these delightful Lemon Marbled Cheesecake Bars!
Lemon Marbled Cheesecake Bars

These Lemon Marbled Cheesecake Bars are a delightful treat, combining the richness of cheesecake with a bright, tangy lemon swirl. Perfect for a light dessert or afternoon snack!
- Prep Time: 20 minutes
- Cook Time: 30 minutes
- Total Time: 50 minutes
- Yield: 16 servings
- Category: Dessert
- Method: Baked
- Cuisine: American
Ingredients
- For the Crust:
- 1 1/2 cups graham cracker crumbs
- 5 tablespoons unsalted butter, melted
- 1/4 cup granulated sugar
- For the Cheesecake Filling:
- 16 ounces cream cheese, softened
- 3/4 cup granulated sugar
- 2 large eggs
- 1/4 cup heavy cream
- 1 teaspoon vanilla extract
- For the Lemon Swirl:
- 2 tablespoons lemon juice
- 1 tablespoon lemon zest
- 2 tablespoons granulated sugar
- 1 drop yellow food coloring (optional)
Instructions
- Prepare the Crust: Preheat oven to 350°F (175°C). In a medium bowl, combine graham cracker crumbs, melted butter, and sugar. Press firmly into the bottom of a 9×13 inch baking pan.
- Bake the Crust: Bake the crust for 8-10 minutes, or until lightly golden. Remove from oven and let cool slightly.
- Prepare the Cheesecake Filling: In a large bowl, beat cream cheese and sugar until smooth and creamy. Beat in eggs one at a time, then stir in heavy cream and vanilla extract.
- Prepare the Lemon Swirl: In a small bowl, combine lemon juice, lemon zest, sugar, and yellow food coloring (if using).
- Assemble and Marble: Pour the cheesecake filling over the cooled crust. Drop spoonfuls of the lemon mixture over the cheesecake filling. Use a knife or skewer to create a marbled effect.
- Bake: Bake for 25-30 minutes, or until the edges are set and the center is slightly jiggly.
- Cool and Chill: Let cool completely in the pan, then refrigerate for at least 2 hours before cutting into bars.
Notes
For a richer flavor, use full-fat cream cheese. Serve chilled and garnish with fresh berries or a dusting of powdered sugar.