
Alright, fellow flavor seekers! Savannah Rose from JustFlowe Blog here, ready to share a truly delightful treat that’s become a beloved tradition in my kitchen: Christmas Lights Cookies! These aren’t your average Christmas cookies; they’re little edible works of art that bring so much joy to our family gatherings. I remember the first time I made them; my youngest exclaimed they looked like tiny Christmas trees ready to light up the night! Now, let’s get into how you can make these enchanting cookies a tradition in your own home.
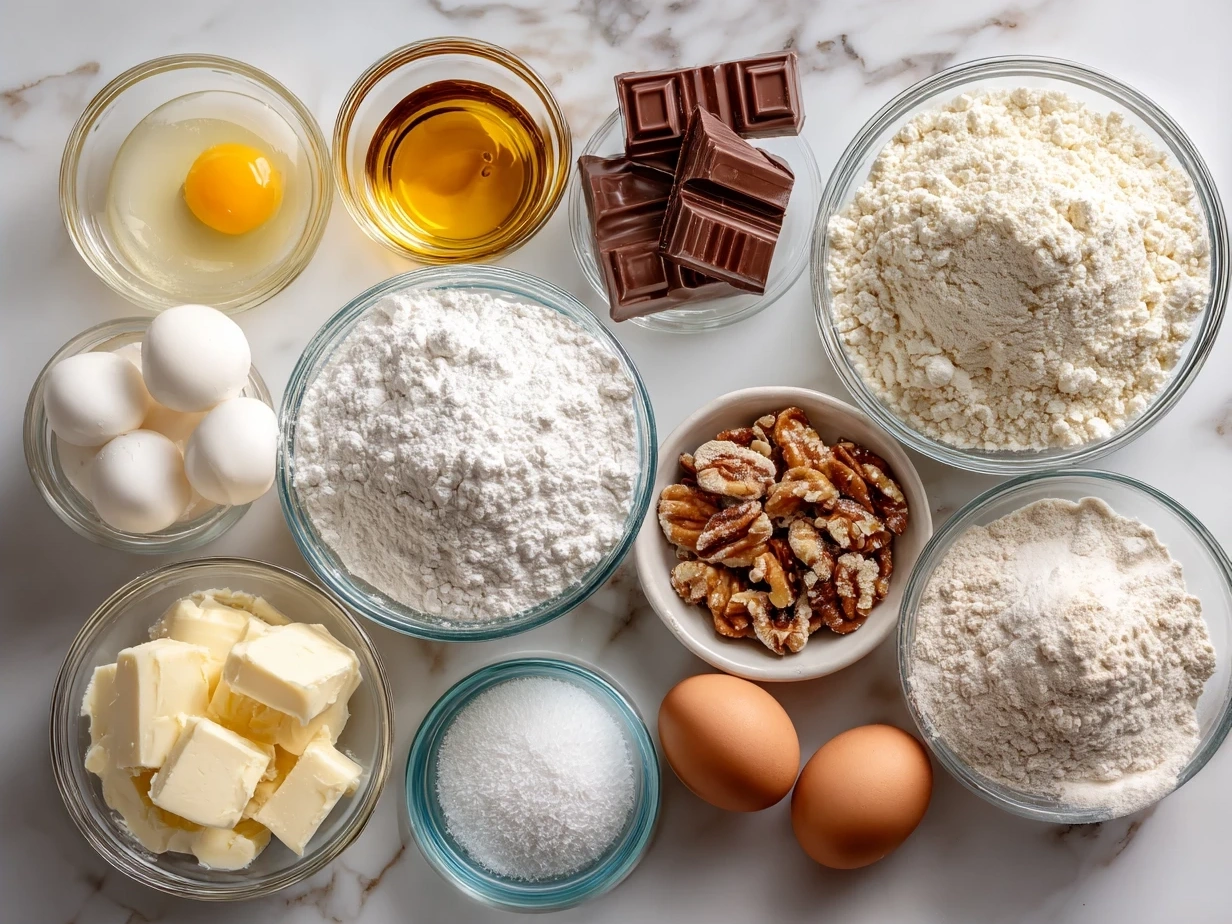
INGREDIENTS You’ll Need:
- 3 cups all-purpose flour: I prefer unbleached for the best texture and flavor.
- 1 tsp baking powder: Ensures our cookies are perfectly light and airy.
- 1/2 tsp salt: Balances the sweetness beautifully.
- 1 cup (2 sticks) unsalted butter, softened: Use high-quality butter for a richer taste.
- 1 1/2 cups granulated sugar: The perfect amount for sweetness.
- 1 large egg: Adds moisture and helps bind the ingredients.
- 1 tsp vanilla extract: Pure vanilla extract is key for authentic flavor.
- Royal Icing: For decorating your Christmas Lights Cookies.
- Gel food coloring: To create vibrant colors for the “lights” on your cookies.
- Edible glitter (optional): For that extra sparkle!
For the best flavor in your Christmas Lights Cookies, I recommend sourcing your vanilla extract from a local farmers market. You’ll find the freshest ingredients for these Christmas Lights Cookies at specialty baking shops or even online. Trust me, this Christmas Lights Cookies ingredient list focuses on quality over quantity for authentic flavors!
Let’s Create This Together!
- Combine Dry Ingredients: In a medium bowl, whisk together the flour, baking powder, and salt. This ensures even distribution and a consistent texture.
- Cream Butter and Sugar: In a large bowl, cream together the softened butter and sugar until light and fluffy. This typically takes 3-5 minutes with an electric mixer.
- Add Egg and Vanilla: Beat in the egg and vanilla extract until well combined. My family loves when I add a touch of almond extract for an extra touch to our Christmas Lights Cookies!
- Gradually Add Dry Ingredients: Gradually add the dry ingredients to the wet ingredients, mixing until just combined. Be careful not to overmix, or your cookies will be tough.
- Chill Dough: Divide the dough in half, flatten each half into a disk, wrap in plastic wrap, and chill for at least 1 hour. This is a crucial step, as it prevents the cookies from spreading too much during baking.
- Roll and Cut: Preheat your oven to 375°F (190°C). On a lightly floured surface, roll out one disk of dough to about 1/4 inch thickness. Use Christmas light-shaped cookie cutters to cut out the cookies.
- Bake: Place the cut-out cookies on a baking sheet lined with parchment paper. Bake for 8-10 minutes, or until the edges are lightly golden brown. Here’s where I used to miss a key step with my Christmas Lights Cookies – learn from my experience!
- Cool: Let the cookies cool on the baking sheet for a few minutes before transferring them to a wire rack to cool completely. Perfect time to appreciate the aromatic transformation!
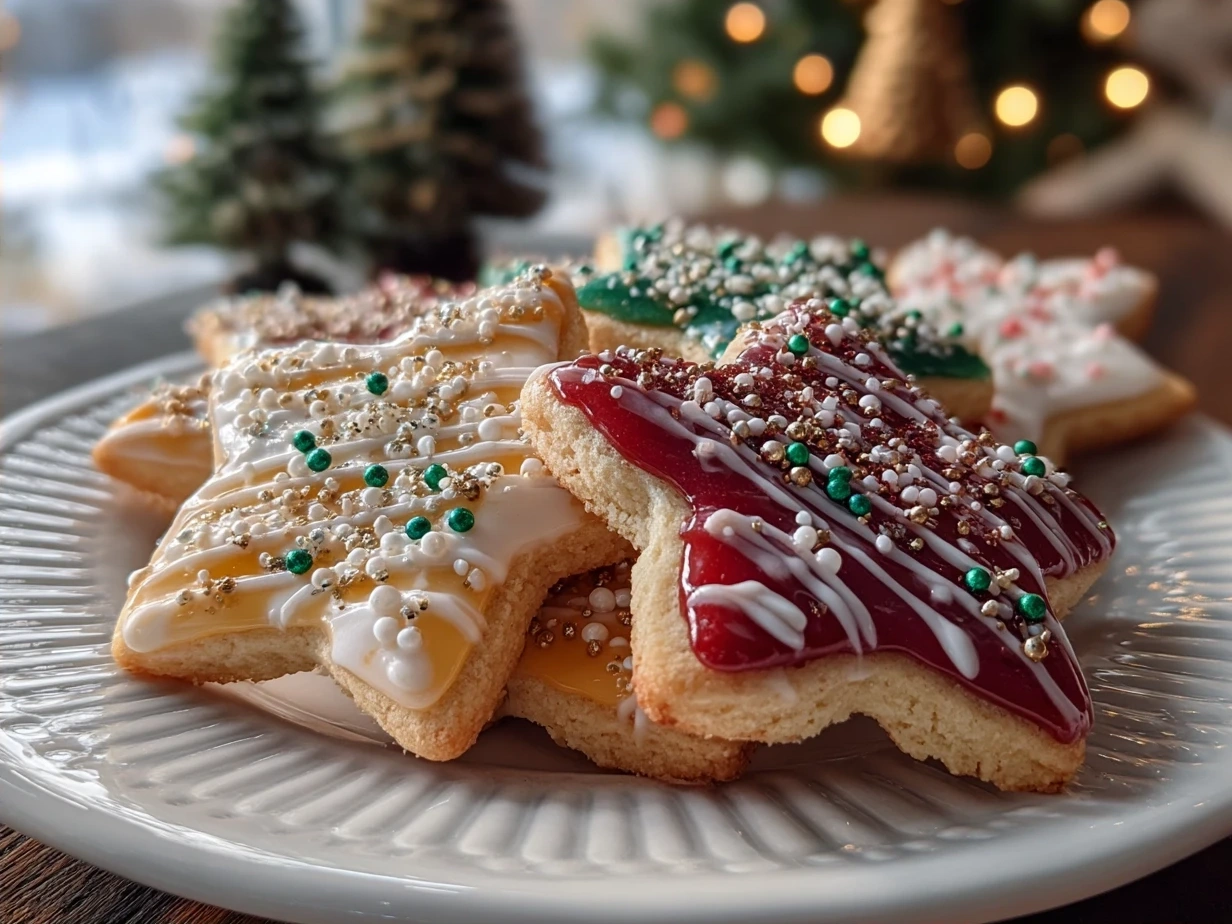
- Prepare Royal Icing: Prepare your royal icing according to your favorite recipe. I recommend this Christmas Cookie Decorating Tutorial with Royal Icing Recipe. Divide the icing into several bowls and tint each with different gel food colors.
- Decorate: Once the cookies are completely cool, decorate them with the royal icing. Use piping bags or squeeze bottles to create the “lights” and other festive designs. While your Christmas Lights Cookies are developing these flavors, take a moment to appreciate creating something special for your family!
- Add Edible Glitter (Optional): While the icing is still wet, sprinkle with edible glitter for a dazzling effect. The Christmas Lights Cookies should fill the kitchen with amazing aromas by now!
- Let Icing Set: Allow the icing to set completely before serving or storing. Don’t be surprised if your Christmas Lights Cookies develops a slight shine as the icing dries; that’s perfectly normal!
How We Love to Enjoy This!
FAQs: Your Questions Answered
Does this Christmas Lights Cookies really satisfy hearty appetites?
What if someone in my family prefers milder flavors in their Christmas Lights Cookies?
How can I prepare this Christmas Lights Cookies ahead for busy weeks?
Can I freeze the Christmas Lights Cookies dough?
What’s the best way to prevent the cookies from spreading during baking?
What kind of food coloring should I use for the royal icing?
Any tips for making perfect royal icing?
Final Kitchen Wisdom:
My Christmas Lights Cookies Flavor Secrets:
- Quality Ingredients: Always use the best quality butter and vanilla extract for the most authentic flavor.
- Chilling the Dough: Don’t skip the chilling step! It’s essential for preventing the cookies from spreading.
- Creative Decoration: Let your imagination run wild with the decorations! Use different colors, sprinkles, and edible glitter to make each cookie unique.
Family-Tested Christmas Lights Cookies Variations:
- Gingerbread Lights: Add 1 teaspoon of ground ginger and 1/2 teaspoon of ground cinnamon to the dough for a warm, spicy flavor.
- Peppermint Lights: Add 1/2 teaspoon of peppermint extract to the dough and decorate with crushed peppermint candies.
- Citrus Lights: Add the zest of one orange or lemon to the dough for a bright, refreshing flavor.
\n \n Print
Christmas Lights Cookies

These Christmas Lights Cookies are a fun and festive treat for the holidays! Decorate sugar cookies with colorful icing and candy lights for a delightful and delicious project.
- Prep Time: 30 minutes
- Cook Time: 10 minutes
- Total Time: 40 minutes
- Yield: 24 cookies
- Category: Dessert
- Method: Baked
- Cuisine: American
Ingredients
- 1 cup (2 sticks) unsalted butter, softened
- 1 ½ cups granulated sugar
- 2 large eggs
- 1 teaspoon vanilla extract
- 3 cups all-purpose flour
- 1 teaspoon baking powder
- ½ teaspoon salt
- Royal Icing (recipe follows)
- Assorted small, colorful candies (e.g., M&Ms, sprinkles)
- Black decorating icing
Instructions
- In a large bowl, cream together the butter and sugar until light and fluffy. Beat in the eggs one at a time, then stir in the vanilla.
- In a separate bowl, whisk together the flour, baking powder, and salt. Gradually add the dry ingredients to the wet ingredients, mixing until just combined.
- Divide the dough in half, flatten each half into a disk, wrap in plastic wrap, and chill for at least 1 hour.
- Preheat oven to 375°F (190°C). Line baking sheets with parchment paper.
- On a lightly floured surface, roll out one disk of dough to about ¼ inch thickness. Cut out desired shapes using cookie cutters.
- Place cookies on the prepared baking sheets and bake for 8-10 minutes, or until edges are lightly golden brown.
- Let cookies cool on the baking sheets for a few minutes before transferring them to a wire rack to cool completely.
- Once cookies are cool, decorate with royal icing and candy lights. Use black decorating icing to draw a ‘string’ connecting the lights.
Notes
For extra flavor, add a pinch of almond extract to the cookie dough. You can also use pre-made royal icing to save time.