When I first set out to master Baked Salmon Sushi Cups, I faced a kitchen challenge that many fellow flavor seekers know well: balancing fresh, authentic flavors that please the whole family without overcomplicating the process. Salmon’s natural richness can be delicate to handle. I learned through trial and error how to bring out its savory goodness, complementing it with vibrant spices and textures that made these baked sushi cups an instant family favorite.
Our dinner table buzzed with surprise and delight when I first served these Baked Salmon Sushi Cups. My kids, picky about seafood appetizers, couldn’t get enough of the gentle crispness on the outside paired with tender salmon inside. My spouse praised the authentic release of umami that felt both comforting and exciting. It was clear that this dish was more than just a new recipe; it had sparked a genuine connection through authentic flavors.
With each kitchen adventure, I refined this salmon sushi cups recipe, focusing on quality ingredients and intuitive seasoning to honor the dish’s roots. What started as a simple trial became a culinary tradition. The technique of baking turned the sushi cups into convenient bites perfect for family gatherings and casual evenings alike. The appeal lies in how truly approachable this recipe is—it invites home cooks to create seafood appetizer bites that appear sophisticated but rely on honesty and simplicity.
If you’re a fellow flavor seeker aiming for nourishing meals that bring your family closer, these Baked Salmon Sushi Cups offer a wonderful starting point. From sourcing fresh salmon to mixing spices thoughtfully, you will find practical insights in every step here. Ready to learn how to bring this authentic dish into your kitchen? Let’s dive into the ingredients that carry its delicious soul.
This flavorful Baked Salmon Sushi Cups reminds me of another family favorite you might enjoy: rice sushi with smoked salmon and avocado, which you can check out for lovely homemade sushi cup ideas at rice sushi with smoked salmon and avocado.

INGREDIENTS You’ll Need:
- 1 ½ cups sushi rice, rinsed until water runs clear (for perfect texture in your Baked Salmon Sushi Cups)
- 1 cup cooked salmon, flaked (fresh wild-caught salmon offers the best flavor here, but farm-raised works if that’s what’s available)
- 2 tablespoons rice vinegar (adds subtle tang that brightens the baked sushi cups)
- 1 tablespoon soy sauce (low-sodium preferred for balance)
- 1 teaspoon sesame oil (my family loves this little flavor secret – it adds a nutty depth to the baked salmon sushi cups)
- 1 teaspoon grated fresh ginger (provides warmth and freshness to the seafood appetizer bites)
- 1 small scallion, thinly sliced (for a gentle crunch and mild sharpness)
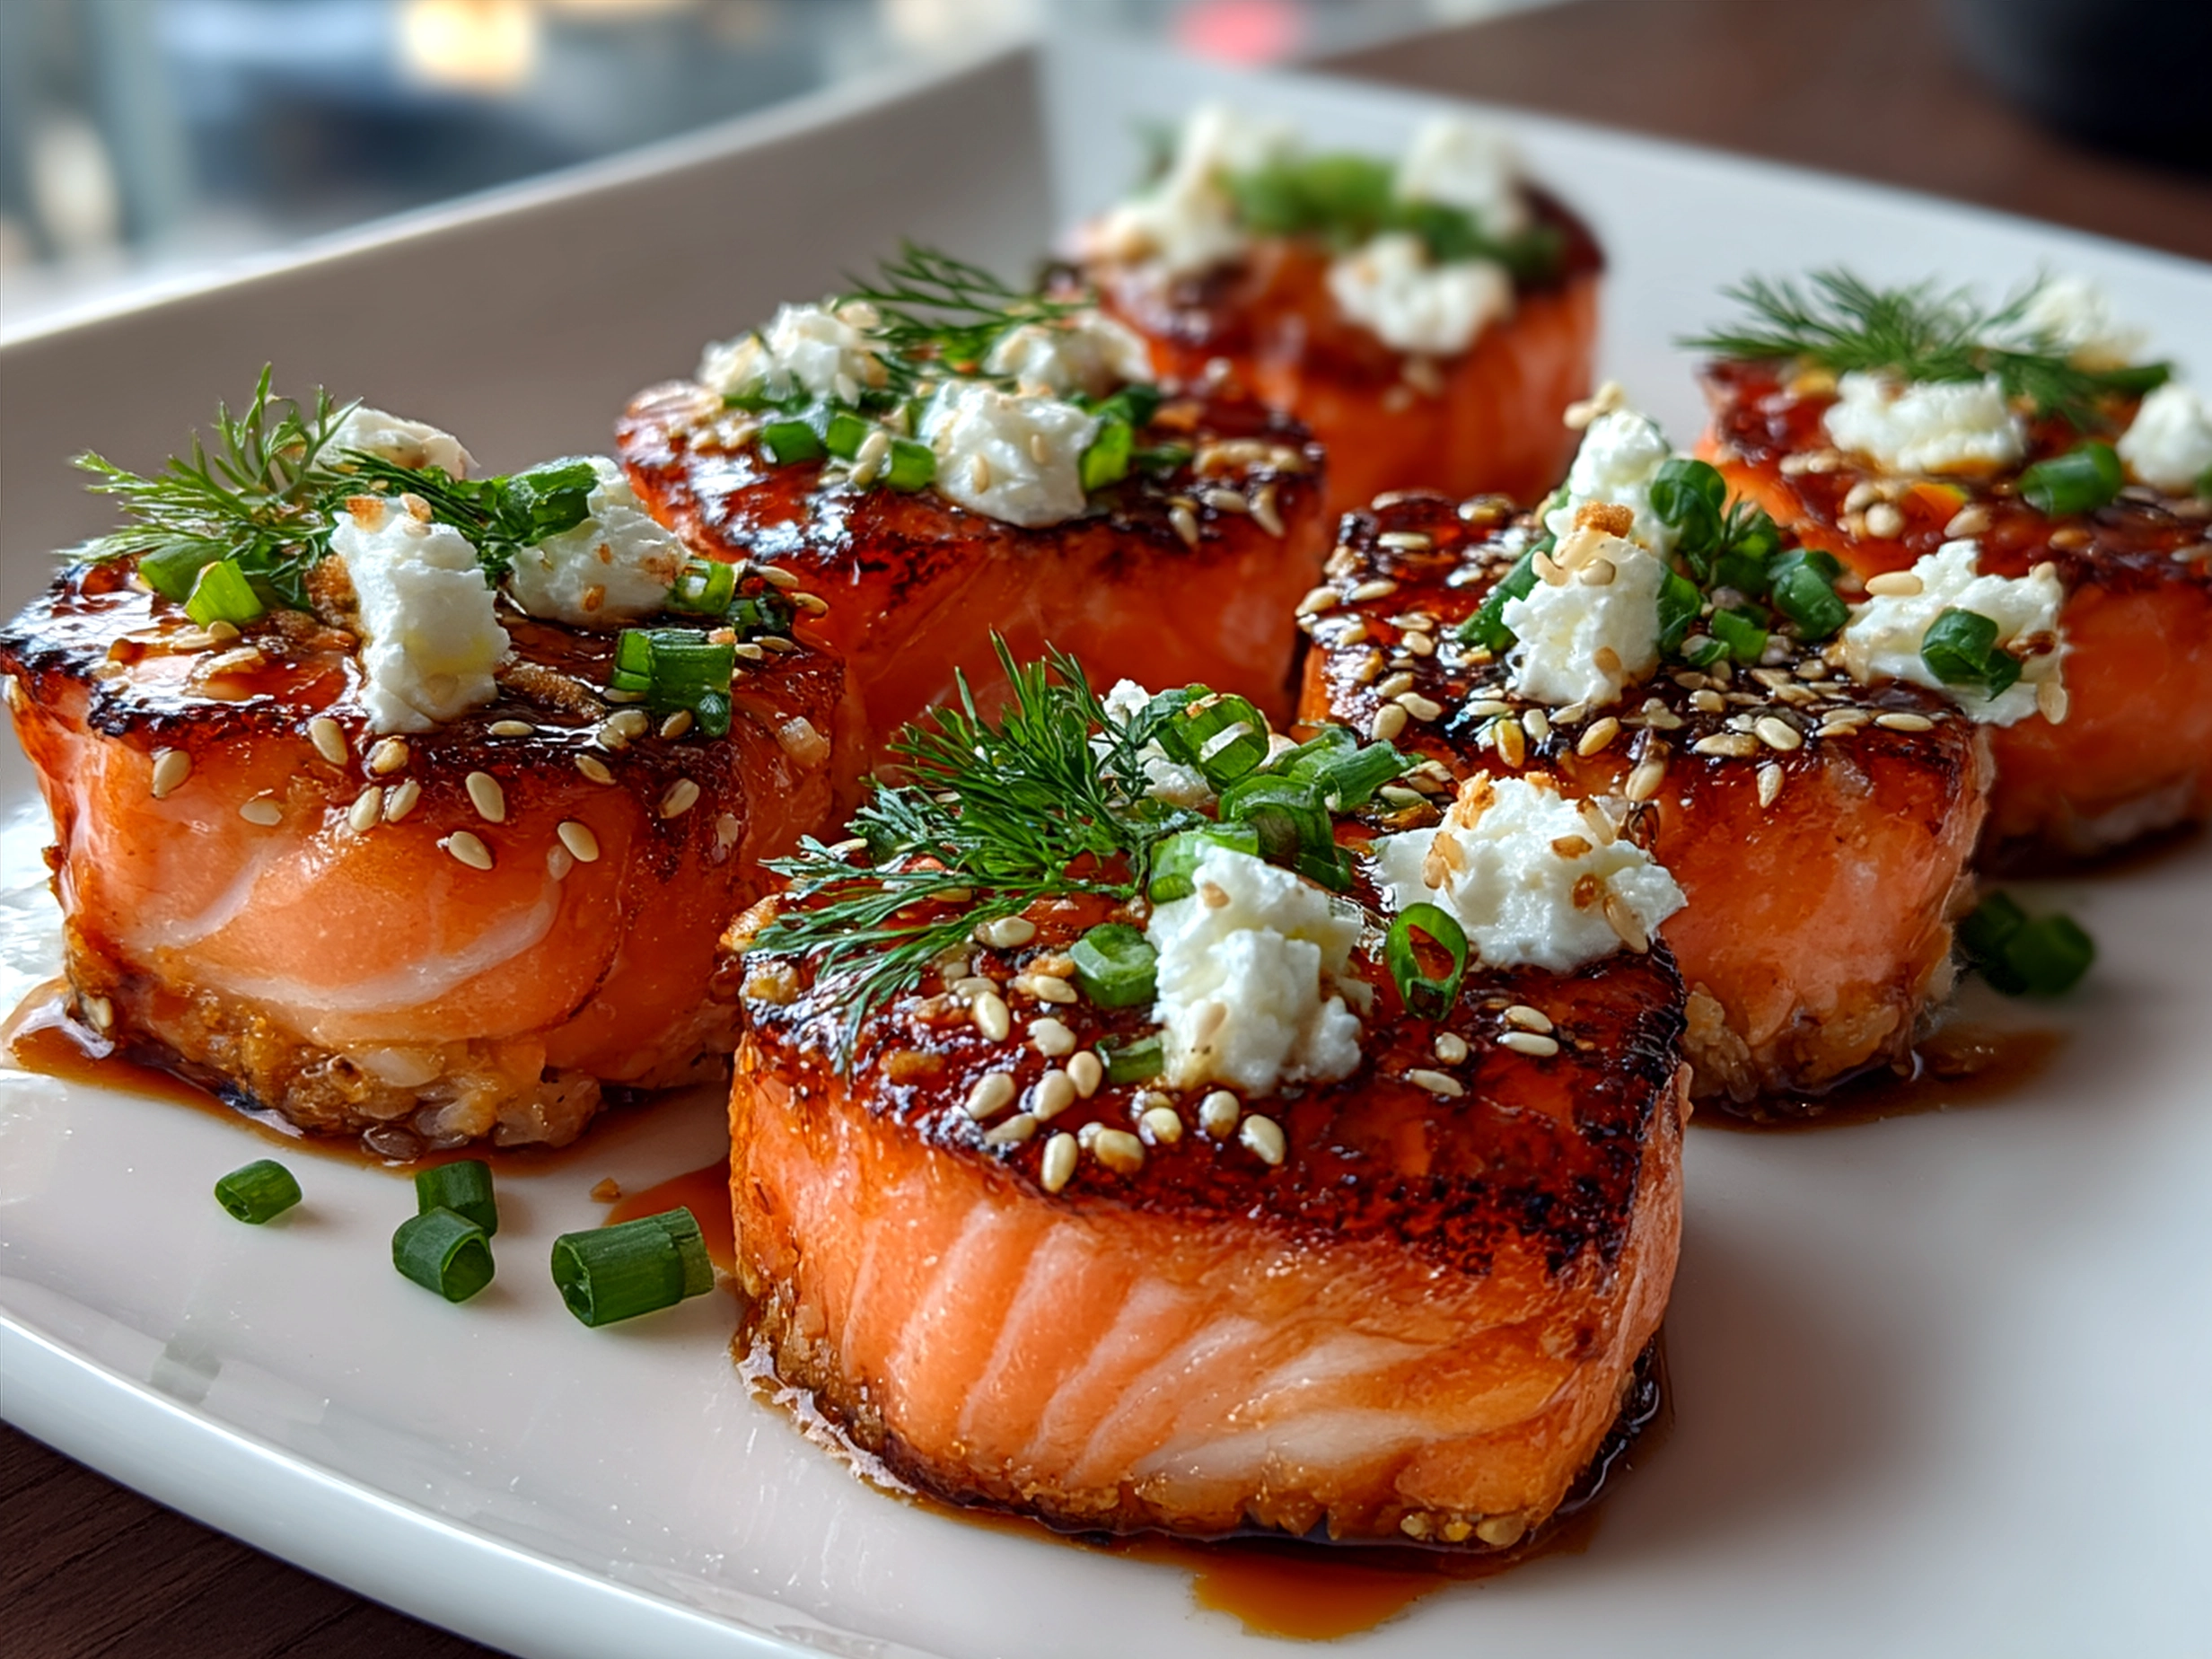
- 1 tablespoon black sesame seeds (used as a garnish, they add beauty and an earthiness that’s distinct in homemade sushi cup ideas)
- Nori sheets, cut into small squares to line muffin tins (helps hold the salmon sushi cups’ shape and adds that authentic umami note)
- Salt to taste
For the best flavor in your Baked Salmon Sushi Cups, I recommend fresh sushi rice from your local Asian market or well-known brands. You’ll find the freshest ingredients for this recipe at farmers markets or specialty seafood counters. Trust me, this ingredient list focuses on quality over quantity for authentic flavors!
If you want to add a slight kick, a pinch of crushed red pepper flakes blends beautifully into the salmon mixture before baking. Your Baked Salmon Sushi Cups will have that gentle heat that excites the palate without overpowering those delicate seafood flavors.
When preparing, make sure to press the rice firmly into the muffin tin lined with nori – this holds everything together during baking and creates that signature sushi cup shape. Flaking the salmon into bite-sized pieces allows for even seasoning and ensures every seafood appetizer bite is a flavor bomb. Here’s a flavor secret that transformed our family dinners: marinate the salmon briefly in the soy sauce and ginger mix before baking to intensify the umami.
For freshness, adding a sprinkle of scallions just before serving lets that crisp contrast shine. This Baked Salmon Sushi Cups recipe proves that authentic flavor comes from thoughtful ingredient choices and a touch of love.
Let’s Create This Together!
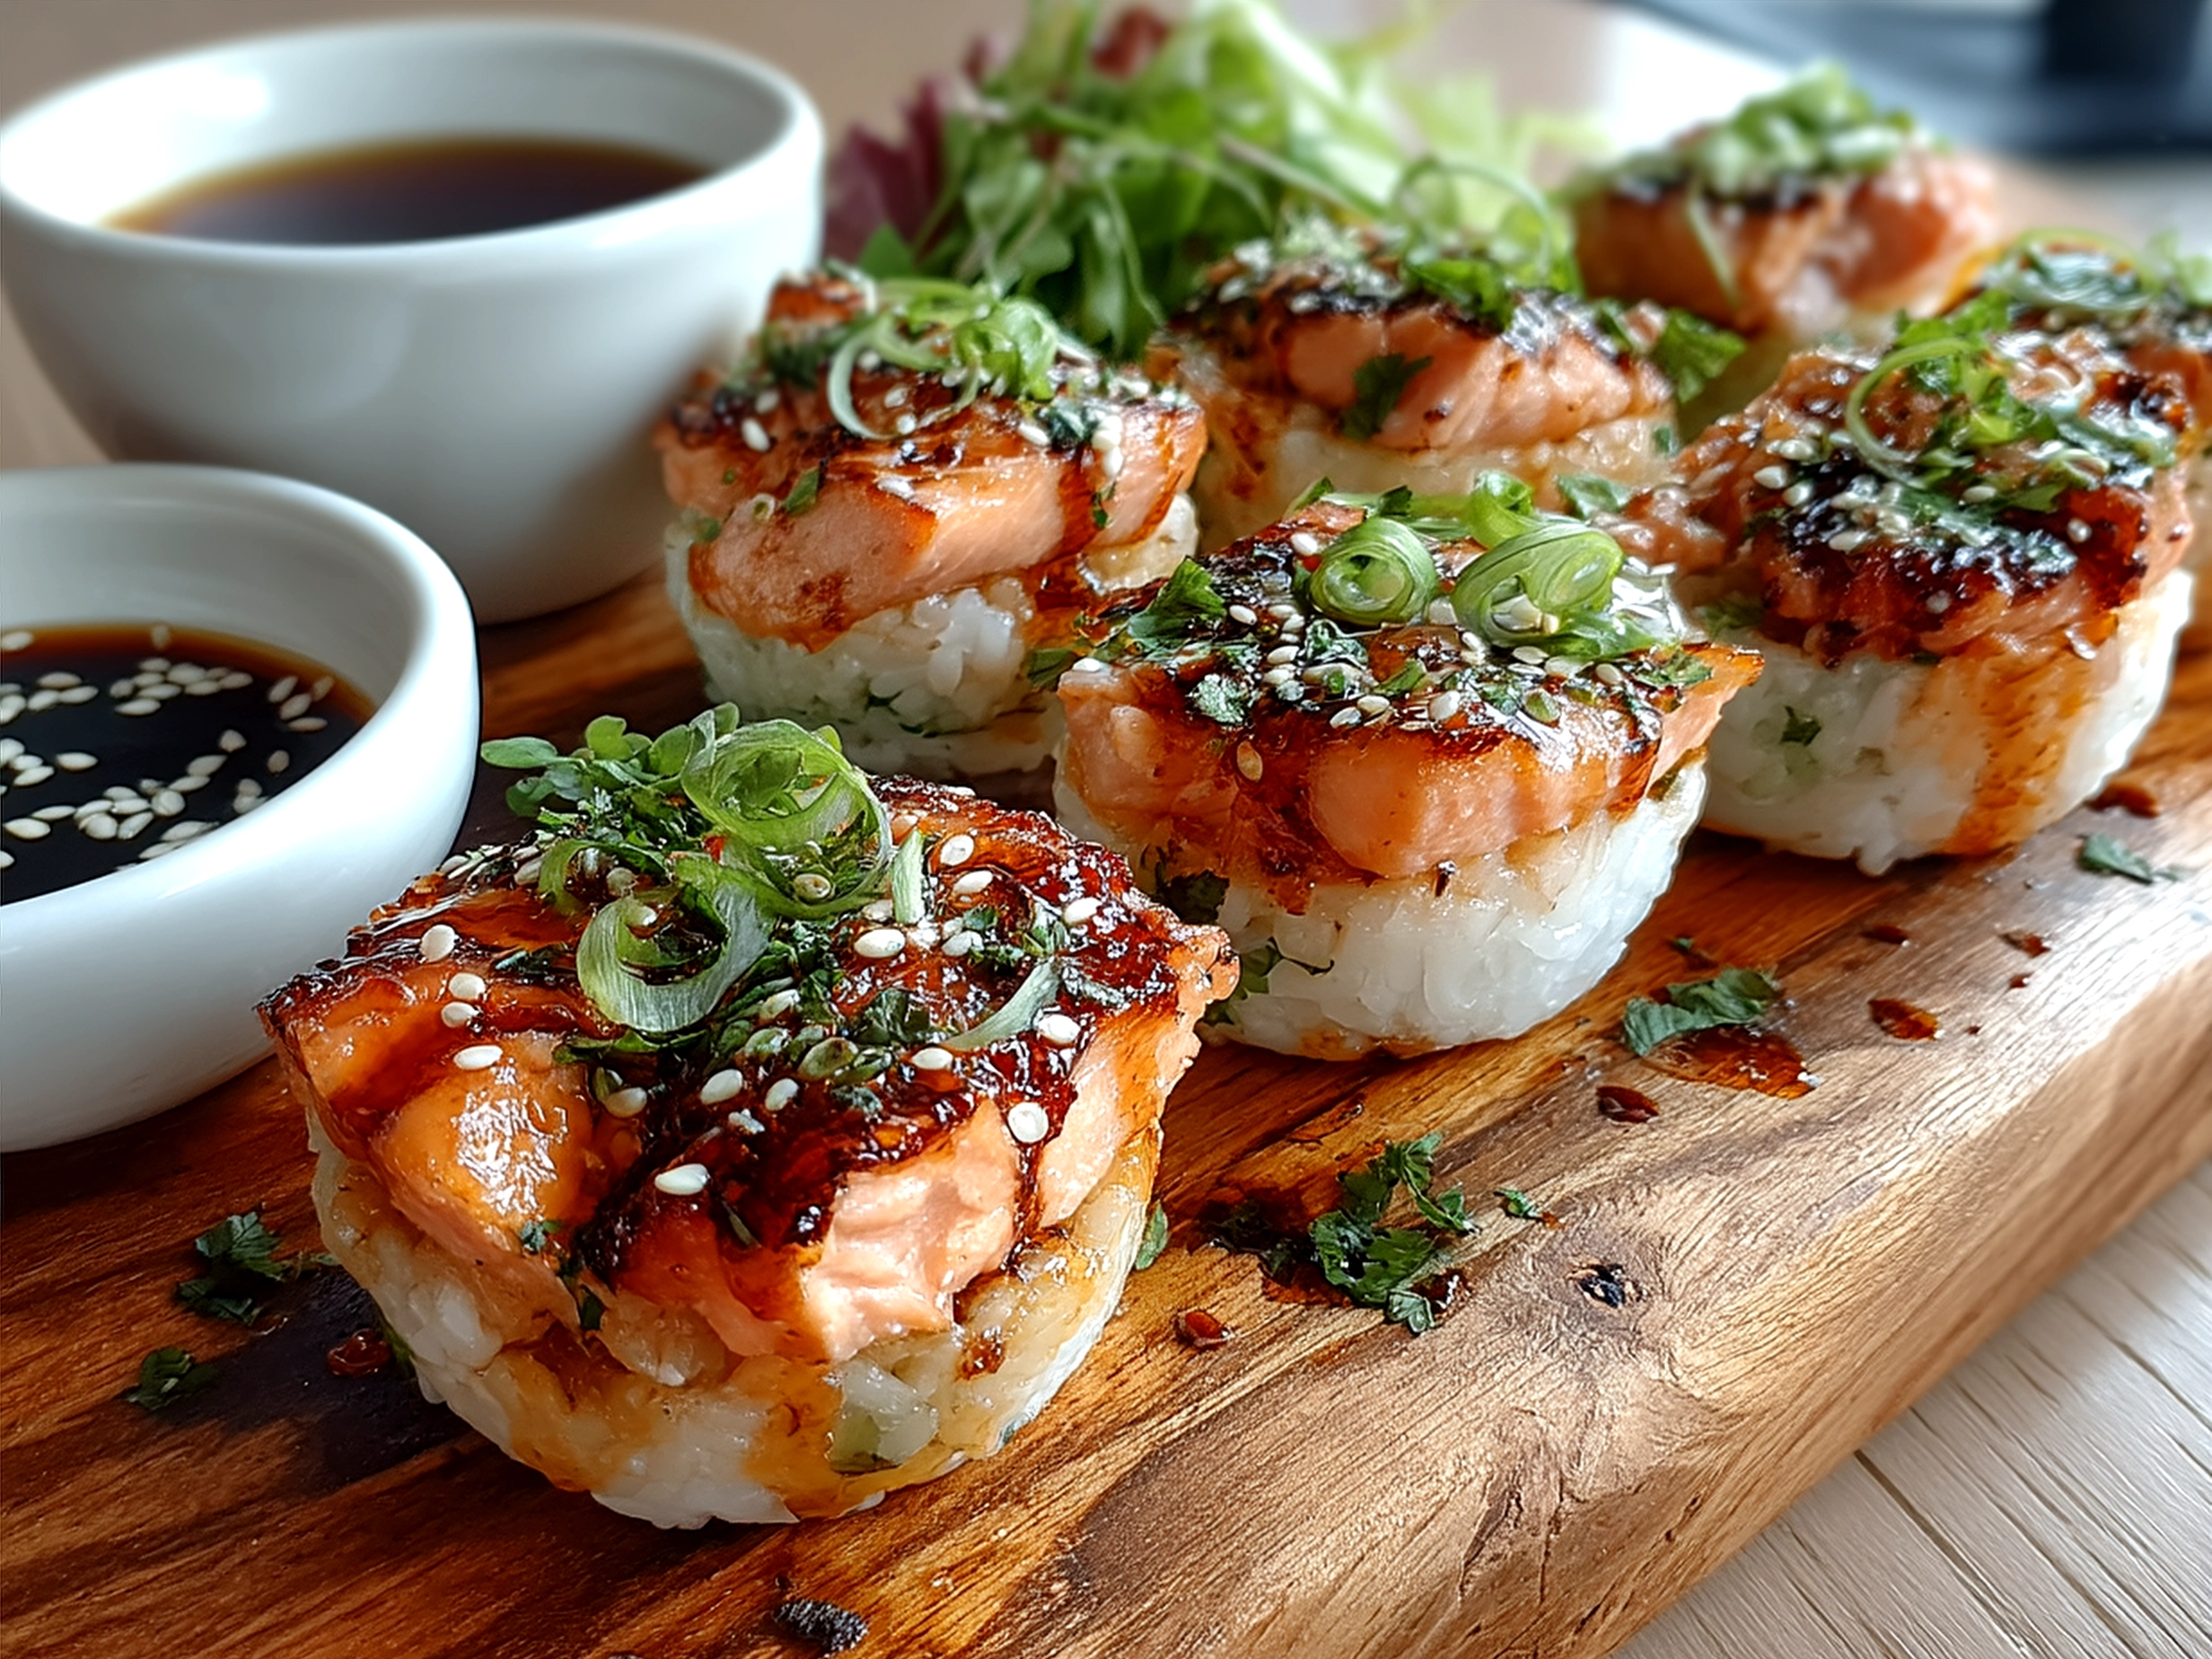
Step 1: Preheat your oven to 375°F (190°C). While it heats, line a muffin tin with nori squares, gently pressing them into the cups to create a hold for your Baked Salmon Sushi Cups. You’ll want the nori to lay smooth on the sides and bottom.
Step 2: Next, prepare your sushi rice. Rinse 1 ½ cups of sushi rice under cold water until the water runs clear to remove excess starch. Cook the rice according to package instructions or in a rice cooker for best results.
Step 3: While the rice cooks, flake your cooked salmon into a medium bowl. Add grated fresh ginger, soy sauce, sesame oil, and salt to taste. Mix gently. This builds the base flavor of your Baked Salmon Sushi Cups. If you want a gentle heat, sprinkle in a pinch of crushed red pepper flakes now.
Step 4: Once the rice is cooked, transfer to a large bowl. Fold in the rice vinegar, mixing well to season without smooshing the grains. Press the seasoned rice firmly into the nori-lined muffin cups—this step is key. A well-packed base means your baked sushi cups hold shape perfectly after baking.
Step 5: Spoon the salmon mixture evenly over each rice base. You want each baked salmon sushi cup to be generously topped but balanced. Don’t overfill, or they might spill during baking.
Step 6: Place the filled muffin tin in the oven. In my kitchen, this flavorful Baked Salmon Sushi Cups typically takes about 15-18 minutes to bake. Keep an eye on them when baking around 15 minutes to gently toast the nori just right without burning.
Step 7: Your kitchen should now fill with amazing aromas—the ginger and sesame meld perfectly with warm seafood notes! Don’t be surprised if your Baked Salmon Sushi Cups develops a slight crisp on the edges of the rice—this contrast is a flavor victory.
Step 8: Remove from oven carefully and allow the baked sushi cups to cool for a few minutes before running a small knife around the edges and gently lifting them from the tin.
Step 9: Garnish each cup with a sprinkle of black sesame seeds and thinly sliced scallions. This adds freshness and visual appeal.
A note here—here’s where I used to miss a key step with my Baked Salmon Sushi Cups: letting the rice cool slightly before baking. I learned this helps keep the rice from becoming too mushy and preserves the texture. While your Baked Salmon Sushi Cups is developing these flavors, take a moment to appreciate creating something special for your family!
For more easy salmon appetizers to complement these baked sushi cups, check out this Baked Salmon Sushi Cups variations that add playful spins.
How We Love to Enjoy This!
The family gathers quickly when this aromatic Baked Salmon Sushi Cups appears with light sides like crisp cucumber salad or tender edamame. The mild acidity from the rice vinegar and the umami-rich salmon play beautifully against fresh vegetables. This Baked Salmon Sushi Cups is perfect for those evenings when we want something truly satisfying but light enough to leave space for dessert.
I like to serve these seafood appetizer bites at weekend family gatherings or casual dinner parties. Their neat presentation makes them great finger foods, and guests always comment on how homemade sushi cup ideas like these feel thoughtful yet approachable.
Leftovers? No worries! I love transforming any leftover Baked Salmon Sushi Cups into a fresh salad bowl. Chop them into smaller pieces, toss with mixed greens, avocado, a drizzle of soy sauce and sesame oil, and you have a quick, nourishing meal. This saves nothing and stretches flavors cleverly.
Seasonally, I’ve played with adding a squeeze of yuzu or lemon to brighten the salmon before baking. In winter, a touch of toasted chili flakes adds cozy warmth. These simple variations never fail to impress family taste buds.
For more serving ideas and authentic meal inspirations that complement Baked Salmon Sushi Cups, explore Easy Baked Salmon Sushi Cups, full of practical ideas for seafood appetizer bites.
FAQs: Your Questions Answered
Q: Does this Baked Salmon Sushi Cups really satisfy hearty appetites?
A: Absolutely! The combination of protein-rich salmon and sushi rice creates a filling dish that holds well for family meals. You can adjust the portion size by adding more salmon topping if you have bigger eaters. My family often goes back for seconds!
Q: What if someone in my family prefers milder flavors in their Baked Salmon Sushi Cups?
A: I recommend mixing half the salmon topping without ginger or pepper flakes and adding them to those cups. It’s an easy way to please picky palates while keeping the bold version for others. The sushi rice base always helps balance flavors.
Q: How can I prepare this Baked Salmon Sushi Cups ahead for busy weeks?
A: You can assemble up to the salmon topping step and keep the filled muffin tin covered in the fridge overnight. Bake just before serving for fresh, warm sushi cups. This saves time without sacrificing that fresh baked aroma.
Q: Can I substitute the sushi rice with another type?
A: Sushi rice’s stickiness helps hold these cups together. Short grain rice can substitute but may change the texture slightly. Long grain rices won’t hold as well in this recipe’s structure.
Q: Are there alternatives to fresh salmon?
A: You can try smoked salmon for a different flavor or canned salmon in a pinch, but fresh cooked salmon provides the most authentic and rich taste for baked sushi cups.
Q: How important is the nori?
A: Nori adds characteristic sushi flavor and helps keep the cups intact. If unavailable, silicone muffin liners could work, but the authentic flavor does change.
Q: Can I make this recipe gluten-free?
A: Use gluten-free tamari or coconut aminos instead of soy sauce, and you have a gluten-free, flavorful baked salmon sushi cups recipe.
For more flavorful insights and practical spice wisdom for Baked Salmon Sushi Cups, check out the viral TikTok Baked Salmon Sushi Cups profile at Kalejunkie.
Final Kitchen Wisdom:
This Baked Salmon Sushi Cups supports my family’s goal of authentic, nourishing meals that please everyone without fuss. It’s proof that you can build layers of flavor with simple, thoughtful ingredients and a technique that invites home cooks into a satisfying kitchen experience.
My Baked Salmon Sushi Cups Flavor Secrets:
- Marinate the salmon briefly with fresh ginger and soy before baking for deep umami.
- Press the sushi rice firmly but gently into nori cups—texture matters!
- Garnish with black sesame and scallions for contrast in flavor and crunch.
Family-tested variations include mixing in diced avocado on top for creaminess, adding a drizzle of spicy mayo for heat lovers, or sprinkling toasted furikake for extra Japanese flair. My spouse favors the spicy mayo version, while my kids adore the straightforward classic.
I hope these Baked Salmon Sushi Cups inspire you to add an authentic, homemade touch to your family meals. Take these flavor-building wisdoms, make the recipe your own, and enjoy the satisfying smiles that come with sharing a meal crafted from care.
For more genuine cooking ideas for family meals, explore easy baked oats here: Easy Baked Oats Recipe or indulgent baked mac and cheese at Baked Mac and Cheese Recipe.
Keep cooking with heart, fellow flavor seekers! Your kitchen adventures are the best way to bring your family closer through food that tastes as good as it feels.
Baked Salmon Sushi Cups
These Baked Salmon Sushi Cups offer a delicious twist on traditional sushi by combining tender baked salmon, seasoned rice, and fresh vegetables in a convenient cup format perfect for appetizers or light meals.
- Prep Time: 20 minutes
- Cook Time: 20 minutes
- Total Time: 40 minutes
- Yield: 12 servings
- Category: Dinner
- Method: Baked
- Cuisine: Japanese
Ingredients
- 1 cup sushi rice
- 1 1/4 cups water
- 2 tablespoons rice vinegar
- 1 tablespoon sugar
- 1 teaspoon salt
- 8 oz fresh salmon fillet
- 1 tablespoon soy sauce
- 1 teaspoon sesame oil
- 1/2 cucumber, finely diced
- 1 avocado, diced
- 2 tablespoons mayonnaise
- 1 teaspoon Sriracha sauce (optional)
- 2 sheets nori, cut into small squares
- 1 tablespoon toasted sesame seeds
- Green onions, thinly sliced for garnish
Instructions
- Preheat the oven to 375°F (190°C). Lightly grease a mini muffin tin.
- Rinse sushi rice under cold water until water runs clear. Combine rice and water in a pot and bring to a boil. Reduce heat, cover, and simmer for 15 minutes. Remove from heat and let rice steam covered for an additional 10 minutes.
- In a small bowl, mix rice vinegar, sugar, and salt until dissolved. Gently fold this seasoning into the cooked rice and let it cool to room temperature.
- Place salmon fillet on a baking sheet, drizzle with soy sauce and sesame oil. Bake for 12-15 minutes until cooked through. Flake salmon into bite-sized pieces once cooled.
- In a small bowl, combine mayonnaise and Sriracha sauce to create a spicy mayo (optional).
- Line each mini muffin cup with a nori square, pressing gently to fit the shape.
- Press a layer of seasoned sushi rice into each nori-lined cup to form the base.
- Add diced cucumber and avocado on top of the rice.
- Place flaked salmon over the vegetables in each cup.
- Drizzle a small amount of spicy mayo over each cup, then sprinkle with toasted sesame seeds and sliced green onions.
- Serve immediately or chill briefly before serving.
Notes
For added crunch, sprinkle some finely chopped toasted almonds or tempura flakes on top before serving.